Topping out is anxiety-inducing for a lot of climbers. There are a few reasons for this, but most of them stem from the fact that climbing skills are terrain specific. Every topout involves a significant and often novel angle change, and each one requires a different set of movement skills, strategies, and body awareness.
Maybe it won’t always look great. Sometimes, topping out looks and feels terrible. But rest assured, it is a skill. And skills can be practiced.
First I’ll cover some common mistakes and the tactics you can use to avoid them. I’ll summarize this as general strategies to keep in mind. Then finally, I’ll go through some common techniques based on the different terrain you’ll encounter while topping out.
If you’re more of a visual learner, definitely hang on til the last third of the post. There are lots of pictures and videos after all the theory, but the theory will help it make sense!
Common mistakes when topping out
The number one mistake I see is less of a topout issue, and more of a tactical issue: not rehearsing the topout!
Obviously if you’re trying to flash a boulder, you can’t do this. But if it’s something that you’re projecting or just trying for a while – always, always, always check out the topout. Always!
Remember a minute ago, when I said we don’t usually get enough practice on topouts? Here’s your chance to practice. Rehearse that sucker. If the first time you do a topout is when a send of your project is on the line, of course it’s going to be stressful. And that stress will feed into your next project, making you dread that topout, and so on.
Here are some other common mistakes I see in topouts that can lead to this cycle of fear and self-doubt, or in unlucky cases, injury:
- Committing to a heel for longer than necessary
- Using a knee when a toe or heel would be practical
- Flopping the whole body over to the side
- High stepping too early instead of building the feet
- Not getting the high foot close enough to midline
- Letting the angle of push on the foothold stray too far away from the plumb line
- Rushing a novel movement (usually a result of being over-adrenalized)
Every situation is unique. There are cases where each of these techniques would make sense. (We’ll talk about some of them later.) But much of the time they’re an unnecessary risk. As always, practice is the best way to figure this out for yourself.
Heels, toes and knees
We are dependent on tactile feedback from our points of contact to tell us what’s going on. When we decrease the quality of that feedback, it can send a signal to the brain that the situation is unsafe. This is often self-reinforcing:
- Anxiety/fear causes us to make a poorly thought out movement choice
- We use an unusual or less sensitive body part (knee or entire leg)
- Brain gets little feedback and decides the situation is unsafe
- Panic and anxiety set in, causing further unreliable decision making
Your knee is not a sensitive body part. Using it may make sense in the moment because it feels “closer” than high-stepping. Finding a way to get the trailing foot (and center of gravity) higher first would almost always be a better choice.
Heeling holds to rock over is a good choice from a muscle engagement point of view, and often we can get our heels higher than our toes. But heels also have lower proprioceptive feedback compared to toes, and we lose access to the essential ability of the ankle joint to flex multidirectionally. This flexibility is an escape route if our handholds become unstable, allowing us to keep our feet underneath us as we start falling. So using a toe isn’t just a physical choice, it’s a safety choice.
Effective climbers will often find a “halfway point” during a mantle where they go from rocking over on a heel to using a toe for the subtlety, balance and escape route it offers. This is a great strategy if you like the initial power of rocking up on a heel or if your choice of foot is far away from your midline.
Strategy: “If you Flop, you drop”
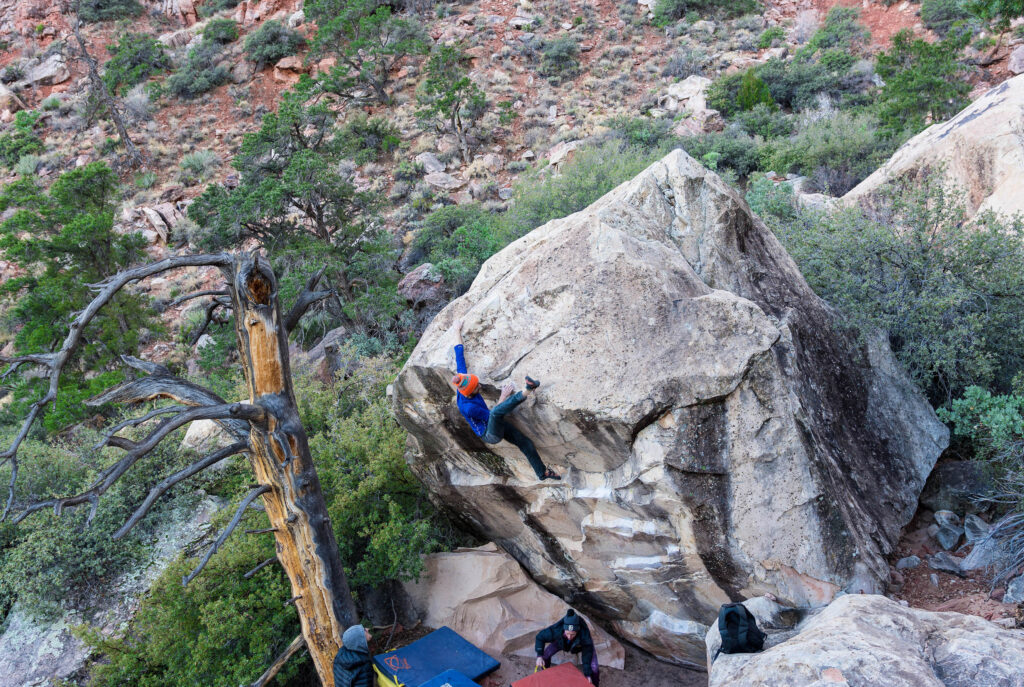
One of the biggest mistakes I see people make topping out is when they flop over the boulder instead of continuing to rock climb. They gracelessly wiggle and flap around like a muppet being electrocuted in an effort to get their center of gravity just a little bit closer to the finish line.
The Flop has several downsides:
- It worsens the angle of force on the footholds (more on that shortly)
- It takes away your line of sight to more footholds (and anything happening below you)
- It puts you close to the wall, making it impossible to bend your knees to step up
These are basically all your tools to keep moving upwards. Once you commit to The Flop, “muppet electrocution” is your only remaining option. To avoid this Kermit death waltz, you need to keep your options open. You need to keep rock climbing.
The “upsides” to the Flop, if there are any: it takes away the scary vertical world below you, and replaces it with a nice, new horizontal world. This of course is a false security, and often a temporary one. Second, The Flop gives you a lot of contact with the boulder, which also provides false security. These seem like good things in the moment, but can result in either a bad fall or the anxiety of a bad fall.
Why does this happen? It might be because climbers think staying close to the rock is always a good thing. In some forms of climbing, keeping your hips really close is a good thing. But not always.
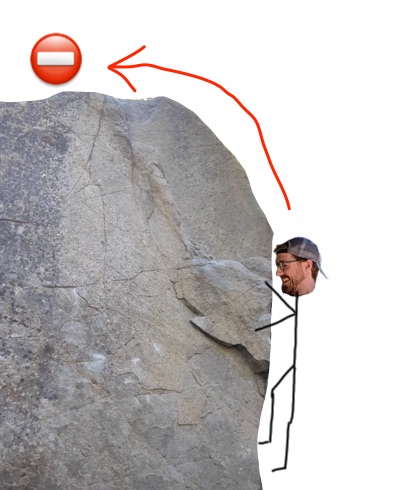
The alternate strategy is to keep climbing upwards. Your center of gravity usually needs to go up more before it moves forward on to the boulder. On harder topouts, this will be less true, because your body needs to stay close-ish to the wall in order to get the best plumb line and friction on the handholds. Let that be the exception, not the rule. Play with that third dimension while you practice. Lean out a bit, lean in a bit.
Side note: if you think there’s even a small chance you’ll wind up doing a flop-mantle, keep your shirt on. Scraping your nipples on granite is quite unpleasant. You only need to learn this lesson once. Thank me later.
Stepping up
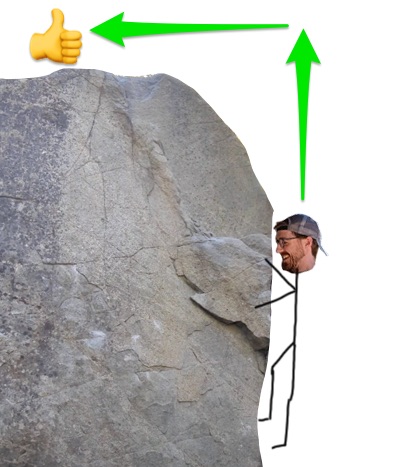
Choosing what foot to use for the final press is an essential top out skill. When there are options, a sort of Goldilocks rule applies: not too high, not too low, not too far from midline, not too close to midline. Practice lots of variations of these situations. Then, when there are fewer feet available, you’ll understand the technique to use for a given option.
I’ll refer to the two feet in a topout situation as “the topout foot” and “the trailing foot.” The topout foot is the one you’re rocking onto. The trailing foot is the one that you stepped up from, or that is flagging underneath an angle change.
When the topout foot is too high or the trailing foot is too low, a lot of leg power will be required to get the center of gravity upwards. If this leg power is not available, this situation can quickly become The Flop or a fall. Often the best solution is to back off and bring the trailing foot up before committing to the high topout foot. The distance between the two is just as important as how high the foot is compared to your center of gravity.
When the topout foot is too low, the leg may become straight or come off the foot before the climber is able to fully stand up on the boulder. This, again, may result in The Flop. It can be saved by bringing the alternate foot up, or backing off to pick a higher topout foot. In some cases hip scumming the wall can do the job.
When the topout foot is close to midline, you get a similar situation to too high: really good hip flexibility and end range leg power is necessary to shift the bodyweight over the foot and make upward progress.
When the topout foot is far from midline, you wind up with the situation where a heel feels more comfortable. This can be fine for a while, but often you’ll want to move your hips towards that topout foot to get your center of gravity more over it before you’re able to make upward progress. If your trailing foot is low, that hip shift will be difficult.

All of these combinations can be practiced on a plyo box, retaining wall, etc. Just stand in front of it and try to step on to it in different places with and without the use of your hands or a trailing foot. You will quickly learn where your personal comfort zone is. Now you can learn to look for foothold options in that comfort zone, or how to move your body in space to “move” the available footholds into that zone.
To summarize, in the ideal situation:
- The climber has good muscular leverage on the topout foot
- The trailing foot is on something, or at least applying pressure to the wall
- The topout and trailing foot aren’t too far away from each other
A pistol squat is often considered a strength benchmark for bouldering. This benchmark is almost utterly arbitrary, except in a scenario where you’re committed to a single foothold and have no great handholds to assist in topping out. It’s one of those things you wouldn’t notice until that exact situation – and then you’ll be really glad you have it. It’s crucial to learn what foothold options give you the most leverage and help avoid The Flop.
Force vectors and plumb lines, oh my
This is a topout post, but let’s take a second to talk about some basic climbing techniques.
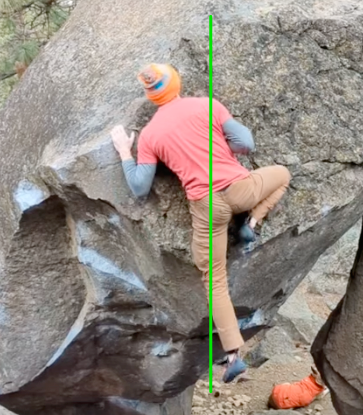
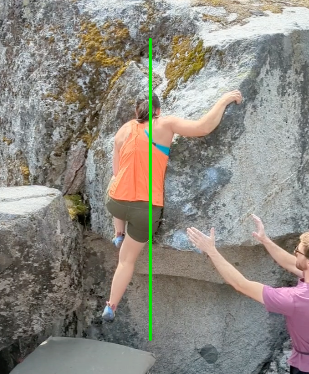
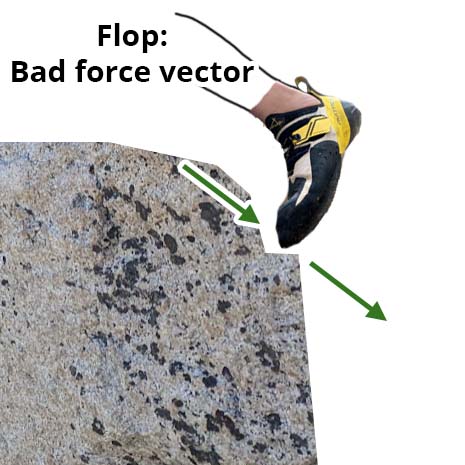
First, let’s define two terms. “Force vector” means the angle at which some force or pressure is being applied in space. When you’re standing on the floor, your body’s force vector (gravity) is straight down. If you kick a door open like John McClane, the force vector of the kick is straight into the door.
“Plumb” in a carpentry context means straight up and down; in a climbing context, it means perpendicular to the hold’s most beneficial surface. A side pull would have a plumb line going straight left to right. Most flat footholds have a plumb line that’s straight up and down. All angled slopers are going to have slightly different plumb lines.
Putting these two ideas together, we can see that good climbing technique keeps our force vector applied as close as possible to a hold’s plumb line. In pressing patterns, we’ll be pushing force into the plumb line. In pulling patterns, we’ll be pulling force away at the plumb line. In topouts, the hands often go from pulling to pushing, but the plumb line of the holds themselves don’t change. During that moment when we switch patterns, the force vector might be bad for a second. We might also be really pushing our joints into some weird positions. Footholds usually keep pressing, but the trick with feet is keeping the force vector close to the plumb line.
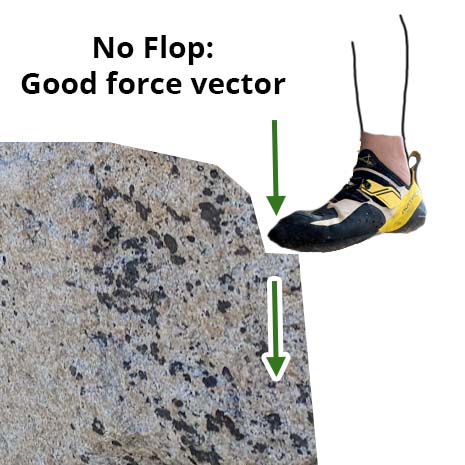
One of the main topout skills is understanding the force vector of your feet on the holds. One reason that continuing to climb up is such an important cue is that it helps keep the force vector closer to the plumb line on the holds. Flopping takes away our ability to exert force in a good vector, closer to the plumb line of the foothold. And to revisit the “stepping up” section, part of the goal of understanding those placements is knowing where you can get a good amount of force into the right vector on the foothold.
Understanding how to use force vectors and plumb lines is essential to good climbing technique. The difference with topouts is that it also becomes a safety concern. Because we have less practice on the novel terrain we’re climbing through when we top out, the physics get muddy. This is not helped by scary-topout-tired-dumb-dumb-monkey-brain. Practice will help things clear up.
Exceptions
Some topouts are just hard.
Often, all these concepts I just explained conspire to force a climber into a situation where a flop is necessary, or a knee really is the best solution. What matters is practicing the techniques, so you know when the situation at hand is actually an exception. Relying on bad topout beta consistently isn’t just bad aesthetically or technically. It’s a safety hazard.
Good strategies for topping out
First off, keep in mind that rock climbing is dangerous. Practice these strategies, and all rock climbing techniques, in a safe and low commitment environment before trying to implement them in stressful scenarios. People get hurt all the time bouldering. You could be those people if you’re not careful.
Rehearse the topout.
Just do it.
Do a mental reset before topping out
If there’s any kind of good hold available, take a second. Relax your arms. Take a deep breath. Look left and right. Breathe again. Look down if that doesn’t stress you out. (On normal-size boulders, it helps me remember that retreat is possible: I don’t have to go up if I don’t want to.) Look for foothold options. You can engage with your spotters if that helps you – a simple “You got me?” works. Smile to yourself if that helps you relax. Choose your footholds. Set your face to be determined. Take another breath. Go for it.
Keep climbing up – don’t flop
Keep going up until topping out is just like stepping up on to a box. This takes a lot of different forms, but the key is to keep going upwards. Remain in the vertical space until you’re standing on the boulder. Don’t flee to the horizontal. Remember: avoid the Flop.
Build the feet up high before committing
Continuing to climb up means you need footholds. Relax at the last point you can, then get those feet high so that the distance between your trailing foot and topout foot is shorter. It’s OK if this feels off-balance for a second. More practice in this situation will help with that sensation.
Default to a toe
This will of course depend on where the right topout foot is for each problem. But if you’re not sure, default to a toe. If you can’t get your toe on the spot you’re looking at, then consider your trailing foot and center of gravity. Could you change your trailing foot, or shift your hips, to make your foot of choice better?
A heel is often good for the first half of the movement. A knee is usually only a good idea if you’re almost done topping out – and then it’s only a good idea if you’re still climbing up, and not flopping.
Keep the knee pointed skyward
Keep that leg strong, and the knee towards the sky. This will keep the angle of force downward on the foothold, and is more likely to make you move upwards. This will be hard on some topouts. But generally, it’s a good rule. Hip opening flexibility can be essential for this, since the torso might need to face towards the wall.
Keep the elbow or shoulder skyward-ish, too
If you’re primarily mantling with your arms rather than rocking over a foot, such as in a “get out of the pool” mantle, try to keep the line of pressing straight down until you can get a foot up. Same rule applies: good force vectors are stronger and safer, even if they feel less balanced or more scary. Good internal rotation might help.
Learn how to fall safely
If you don’t know how to fall, topping out is always going to be scary because you’ll feel like you don’t have the option to back off. Practice at the gym. Learn to redirect your momentum. Aikido or tumbling classes are great for this. Do squats and box jumps. Bouldering involves a lot of falling. Falling is an absolutely paramount skill to practice.
Common topout varieties
Every topout is just an angle change. Usually, it’s the last angle change of the boulder. Some boulders will have multiple angle changes out of the ones listed below.
This is by no means an exhaustive list, but I’ll do my best to lay out the common ones, and provide examples.
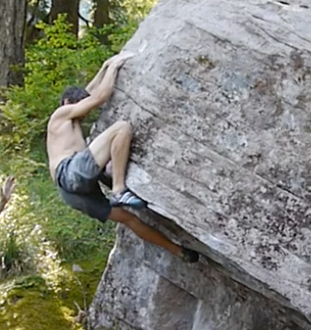
Overhang to vert / overhang to slab / bottom of egg
Usually the hardest part of these is the mental shift from adrenalized power climbing to mostly balancing and relying on the lower body. The more dramatic the change, the harder the mental shift. Finding opportunities to reset and breathe will help.
Sometimes you’ll be able to rest and gather yourself after turning the lip. Sometimes a mantle is involved. Make sure the trailing foot is high when you leave the overhanging section. Sometimes a hip scum might be helpful if you can’t get the foot high enough.
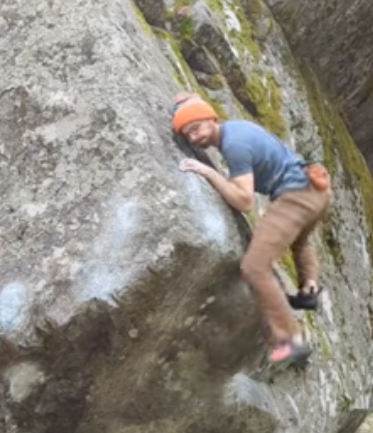
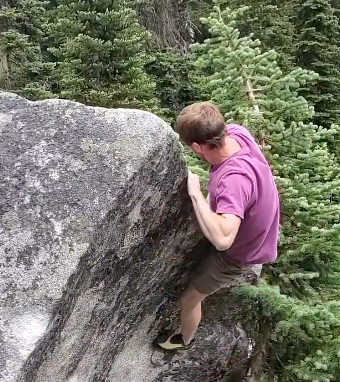
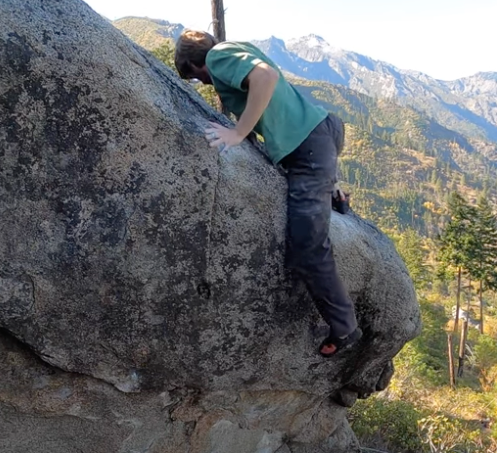
Exiting the overhang on Resurrection Low V10 in Leavenworth. This is a “just don’t stop climbing” style topout with no actual mantle move. Notice that I didn’t have this rehearsed – it had been a long time since I did the stand start, and I surprised myself by climbing through the bottom. Not ideal! But I stayed calm, and kept building my feet and checking in to see if I could step up until I could.
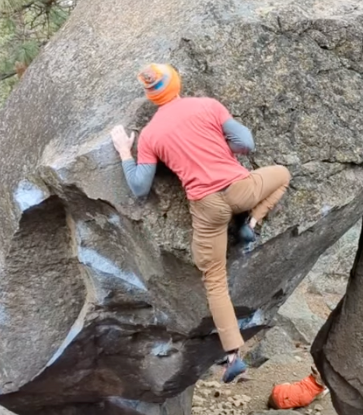
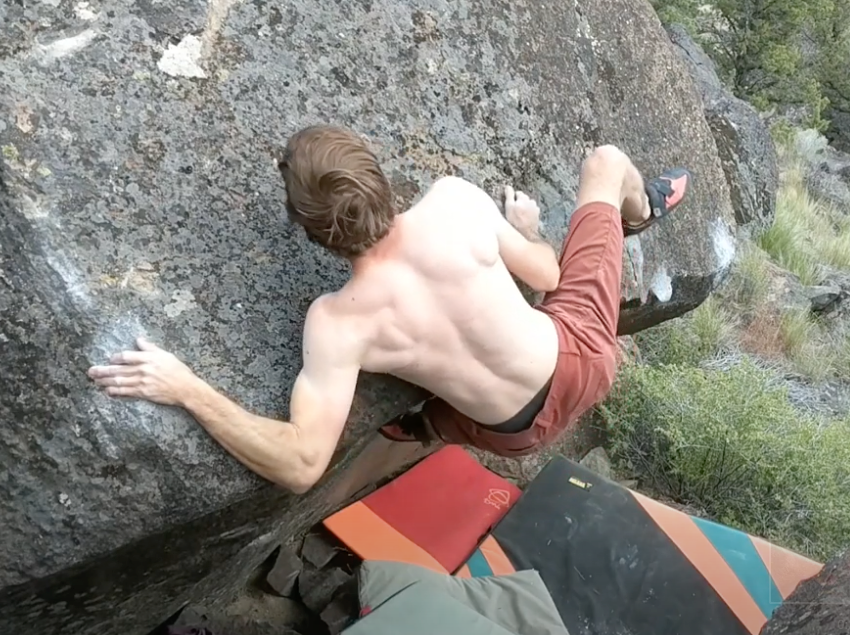
A more extreme example of steep to slab. In this case Jizzsap V8 at Smith Rock. Notice the hip scum to keep pressure, which lets the upper body stay rigid. This would usually be the job of the trailing foot, but the hip works in a pinch. I actually kick that trailing leg a bit to keep moving the hip up against the lip of the boulder, which allows vertical progress until I can squat up on the topout foot.
Roof to vert, or roof to slab
Even more severe version of above. These will almost always involve a mantle, a deep lockoff, or lots of inward/pressing pressure against bad holds. Scumming the trailing hip against the lip of the boulder may be really helpful, since it will provide counterpressure to keep the body more upright and higher than the footholds under the roof.
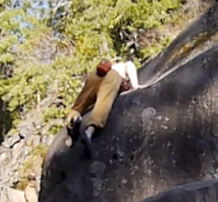
Sean Hendryx on Lost and Found at Lost Lake. Steep angle change + bad holds = hard section of climbing. Notice the strong trailing leg to keep pressure.
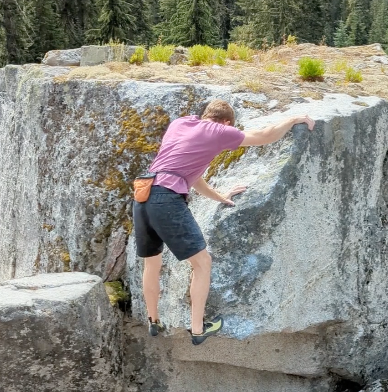
Vert to flat, or gently overhanging to flat
Try to stand up on the footholds below the angle change, and “get out of the pool” on the lip of the boulder. Then you should be able to step a foot up. The most important thing is to not leave your feet behind!
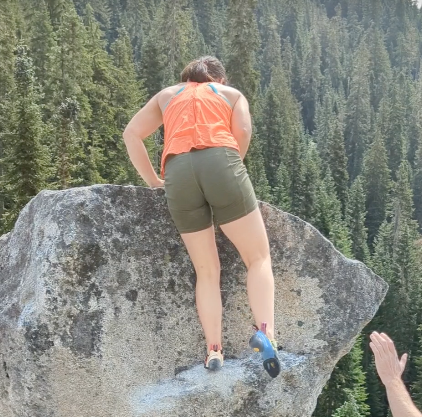
Kim Johnson on Power Struggle, V6, Treasury. Successfully got out of the pool, and preparing to put a foot up. In this case there’s a really good trailing foot, at just the proper height. Nice for practice.
Jewel Thief V9, Mt. Lemmon. I used a high heel here and left the trailing foot behind a bit, but because the wall isn’t very overhanging, the trailing foot is still able to provide a lot of counterpressure to keep me stable and upright even just by flagging. This one also has a textbook heel-to-toe switch halfway through the mantle.
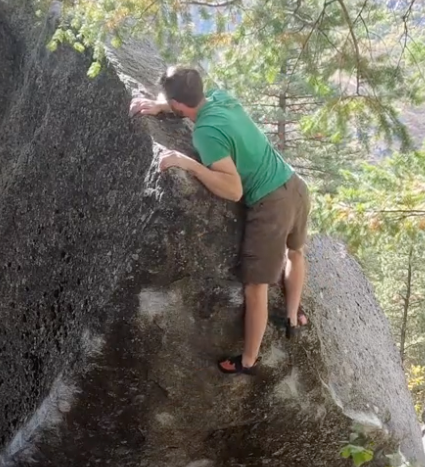
Overhang to flat
One of the most common topouts to get “stuck” on. Climbers often spend a few minutes halfway rolled over on this terrain, trying to make upward progress. In many cases, using the correct techniques it’s still possible to rock over without flopping.
Partway through a mantle on Stolen Valor, V9, Treasury. Body is still moving upwards rather than over. Trailing foot is providing counter-pressure.
These are really good ones to practice your general mantle skills on. While usually physical, it’s often over as soon as you get your center of gravity past the lip, meaning they’re less scary.
Vert to slab / top of egg
This is one of the most devious options, and barely feels like you’re topping out at all. If the holds are lacking, this can be one of the scariest varieties. Boulders that consistently round out from overhanging to flat, like a big egg, will usually have a section that feels this way. If you know the terrain will keep improving, inertia is a huge tool. Take a chance to reset if you can, but then keep moving upwards consistently.
The second mantle of The White, V11 at Mill Creek Falls. Vert to slab can be really scary, especially when it’s a double decker like this. In this case getting all the way out of the pool first, then putting a foot up, is the easiest option. That means turning both hands thumbs-out and locking out the shoulders, with the torso leaning forward (but not flopping!) Notice the elbow towards the sky, not flopping.
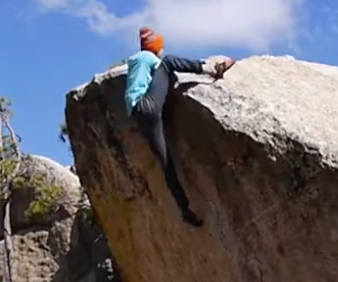
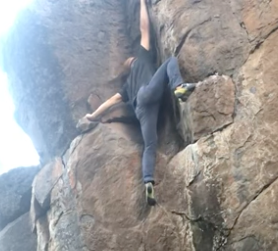
Very overhanging to flat, or roof to flat
Nightmare scenario for those who struggle with topouts: the pancake boulder. Imagine hanging and mantling onto a UFO, or the wing of a plane. The trailing foot can’t push you upwards, and the topout foot is almost over your head.
When it gets really severe, The Flop might become necessary because the trailing foot doesn’t stabilize the body by applying pressure against the lower wall. The method looks like this, but not necessarily in this order.
- If possible, before you commit, reset and prepare for a very physical section of climbing.
- Choose a heel. Rock over on to it.
- Keep the knee pointed skyward as long as possible.
- Be ready to switch to a toe if needed to maintain pressure.
- Bring the head, face and shoulder over the angle change.
- Flip the front (heel side) hand to press. Usually first, not always.
- Flip the back (opposite side) hand to press. Usually second, not always.
For really severe angle changes, you may also bring the trailing foot up around the angle change at the last second, either as an inside toe hook or to put the entire thigh on the rock.
Darth Vader, V9, Mountain Home Road. This is as close as you get to flopping without flopping. My knee folds forward a little bit, but not so far that I lose foothold pressure. My body folds forward a little bit, but just far enough to get weight over that foot and not so far that I’m pressing my body into the wall and losing my force vectors. It’s a rare case where I do a whole mantle with a heel.
Another steep angle change on Spherical Cow, V7, Unlikelies. Notice the strong flagging leg under the roof keeping me stable. Knee skyward through the whole movement. Another textbook heel-to-toe switch, but blink and you’ll miss it.
Topping out into a dihedral
This is a weird, and scary/exposed one. Rarely, boulder terrain carries on into an open-book type feature. If there’s a mantle involved, it’ll almost definitely have a foothold that’s really far from your midline, across the dihedral. Pressing into this feature feels very exposed, and the body doesn’t get as much proprioceptive feedback to stay balanced. Once you finish pressing and get your other foot up, you might be able to take your hands off and regain your composure. One of those cases where having done some trad climbing wouldn’t be the worst idea for your bouldering.
Ricky Marine executing a mantle-in-a-dihedral on The Man With the Golden Gun, V7 in the OR backwoods. Notice the hips aren’t pressed all the way into the corner, but are balanced between the mantle hand and high foot, adding exposure but increasing pressure on the contact points. This move is way off the deck!
Topping out on a corner/arete
Lots of arete features just keep climbing up the arete until it rounds over, rather than having an actual lip feature where you top out. In this case, the climbing just transitions from compression or layback / barn-door climbing straight into balancing. Look for options to create counter-pressure with one hand or the other. It might not look like a traditional mantle. For aretes that can be climbed on either side, try to commit to your choice of topout side before you leave the ground, so you can make sure the pads are in the right place and spotters are ready. Usually the side that has a lower angle face for your feet is going to be the easier side, but not always.
Log Jam, V2, Treasury. My right hand is laying back on the arete, and left hand is providing counter-pressure to keep from barn dooring while I move my feet up. I could flop forwards here, but then I wouldn’t be able to high step. The left hand counter-pressure keeps me balanced and straight above my trailing foothold.
Dealing with multiple angle changes meeting on Johnny Appleseed, V10, Leavenworth. A classic turn-the-arete topout that seems like it’ll be scary, but then suddenly you’re just standing on the slab with a big jug. A great example of how keeping your body free in space, rather than glued to the rock, is advantageous for positioning – and thus makes the holds feel good.
Summary
Most boulderers probably need to work on their topout skills. Way too many times have I seen people blaze through their warmups, groveling and grunting their way through the easy stuff – just to get to their project and put themselves (and their crew) in a predicament by sketching out way off the ground. Practice is the linchpin that determines whether you will get on top of your projects. You get fewer opportunities to try topouts, so you need to make that practice intentional.
Just because it works, doesn’t mean it’s a good idea.
Just because you squeaked it out doesn’t mean you always will.
Winging it becomes a less reliable strategy the farther you are off the ground.
Let’s review the main takeaways:
- Rehearse the topout
- Do a mental reset before topping out
- Keep climbing up – don’t flop
- Build the feet up high before committing
- Default to a toe
- Keep the knee pointed skyward
- Keep the elbow or shoulder skyward-ish, too
- Learn how to fall safely
Look for topouts that are closer to the ground and drill them relentlessly. Climbing in the gym isn’t going to prepare you for topping out outside unless you just happen to have a topout boulder in your gym. Even then, keep in mind that the terrain dictates the challenge. So unless your gym is some kind of Borgesian Library of Babel containing every possible topout, you need to practice outside.
Be ready to learn a novel movement for every topout. Go in humble, come out confident.
Postscript
Information like this post, and the things I post on Instagram, are paid for by my own interest in providing resources to the climbing community. Despite how bad the diagrams are, it takes a lot of work to put this content together.
I believe that everyone should have fair access to the resources they need to have a successful and fulfilling climbing journey. If you want to support me so I can create more resources like this, there are several ways you can work with me: you can take my assessment and get a training brief, book a one-time consult, or get on my wait list for one-on-one coaching. You can also share my content, which increases my audience and helps me find more people to work with.
As always, if the only thing keeping you from working with me is cost, DM or email me and let’s talk about it. Thanks for reading!