Golden Rules
Memorize these. Say them to yourself before you enter the gym or hike in to the crag.
#1: Don’t get hurt training. The point of training is to make progress and injuries are the bane of progress. If it feels like it might be too much, it is. Better to skip a workout than to get hurt. If you get hurt training, your training has failed.
#2: You know yourself best. You know more about yourself and your climbing than anyone else. Don’t blindly follow my plan, or anyone else’s. Take responsibility for your climbing & training. Experts can guide you, but only you can sit in the driver’s seat.
#3: Eyes on the prize. Your goals probably involve actual climbing – and that comes first. Unless we have agreed that strength is the priority right now, you should spend most of your available climbing time with your climbing shoes on. Don’t forget why you’re training.
#4: It’s better to do something than nothing. But it’s way better to do just enough than to do too much. Punching the clock is more important than what numbers you put up. Chasing numbers can be useful, and might squeeze out 1% more improvement – but it might also just leave you tired. What matters most is showing up, and doing the work. Don’t underestimate the value of 20 minutes of climbing, or just 1 working set of an exercise.
Coaching
The touchpoints for coaching are primarily your check-in calls and emails. The planner is for you to take notes on the training so you can remain consistent and progressive. Here’s how to be successful with this program:
- Book your check-in calls in a timely manner (I am often booked out 2-3 weeks in advance.)
- Send your update emails to me weekly. Let me know how your week went. What sessions were good? What sessions were bad? How do you feel overall?
- If you have any question, send me an email! Even the most minor question. Don’t worry about bothering me or taking up my time. You paid for my time.
- If you need a form review for an exercise, film it from several angles, upload it somewhere, and ping me via email. (a Google Photos album will automatically notify me, but you should still email me and request feedback.)
- Generally we will go through your climbing video in our check-in calls. If you have a project or specific move you have a question about, gather some video and let me know. I will sometimes send review videos. But I tend to do this for clients who are already consistent and engaged with the training.
Priorities (what to do if you get busy)
If life gets busy, and you can only accomplish some of your training, here is the recommended priority order for most uninjured athletes:
- Time on your goals (e.g. outdoor routes)
- Climbing sessions (redpoint strength, mileage, board session)
- Sport strength (hangs, low gear, pulling, deadlift, core)
- Technical drills (hip lockoffs, rooting, etc.)
- Accessory strength (squat, press)
If life gets really busy, that’s fine. Just get done what you can, and let the rest go. Try to start fresh next week, or in a few weeks, with more energy. Don’t stress about leaving sessions behind, and don’t try to finish previous weeks. Just move on.
Putting it all together
At the beginning of each week, sketch out a rough plan for what you’ll do each day. It’s OK to adjust as you go, such as based on outdoor conditions, and it’s OK to leave things undone for the week if you run out of energy. This ability to plan your own training is an essential part of continuous improvement regardless of who your coach is.
Make sure you refer back to your plan before you start training each day. Take note of any instructions for the workouts you’re going to do. The details do change from week to week, so pay close attention!
Log your sessions and feedback in the plan sheet. Every day is ideal, but at least every week will work. I will use these logs to keep track of how your training is going, and respond to questions. For more, see “What should I record in my training log”, below.
The RPE scale (Relative Perceived Exertion)
At first, you’ll want to just use RPE as a rough gauge of how something felt. “That squat set was 7/10 RPE.” But later on, we’ll probably use Reps in Reserve.
RIR or Reps in Reserve
RIR is a way of expressing how comfortable you are with a given exercise or session. A good general idea of RIR is that 10 – RPE = RIR. So if you’re doing an RPE7 lift, you should stop when you feel like you could do 3 more reps. (RPE10 – 7RIR = 3 more reps.) This could be expressed as RPE7, or 3 RIR.
For picking loads, you need a set/rep scheme for this to make sense. A set of 5 lifts at RPE7 means you’ll choose a load where you think you could do about 8 reps. (x5 + 3RIR = 8 reps.) You can use a rep max calculator like this one to help guide you if you’re not sure, but be sure to adjust it based on how you feel that day. Sometimes you didn’t sleep well, or your climbing session was hard, or you’re just distracted by life. In those cases, RPE and RIR are better ways of gauging how hard you should try. Don’t be captive to numbers – pay attention to your exertion level.
How to actually use RPE
Your job is to pick a weight that lands you in the right rep range, at the right RPE. This is largely based off of experience and how you feel that day.
If x6-8 RPE7 is programmed, you should do 6-8 reps at a weight you feel like you could do 9-11 (6+3RIR – 9+3RIR) reps.
If you’ve never done this lift / rep scheme / RPE before, you’ll need to fiddle around for a few weeks to lock in some working weights. Once you have some information, here’s how you know when to go up:
- If you’ve done a given weight and consistently hit 8 with 3 or more in reserve for all your sets, go up in weight.
- If you’ve done that weight and consistently hit 6 with less than 3 in reserve, or not been able to hit 6 reps, go down in weight.
- If you’ve done that weight and consistently hit 6 or 7 reps with 3 in reserve, keep the weight the same until you hit 8 for all sets.
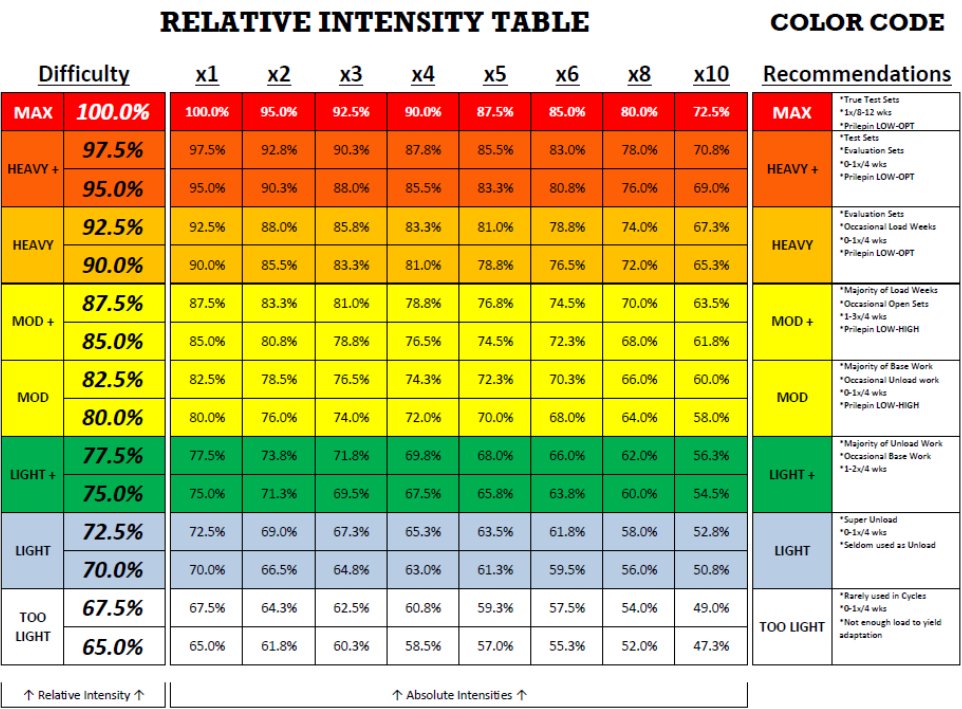
If you’re a linear periodization bro, you can estimate the weight by taking the middle number and getting your %1RM for it. In the above example of 6-8 at RPE7, you would estimate using 10 (7 + 3RIR = 10 reps). Prilepin tables say that your 10RM should be about 70-72.5% of your max, so put that much on the bar and go until you feel you can do 3 more.
You may want to read this article from Barbell Medicine, which explains RPE in more detail.
“Elastic” programming rather than RPE
In power training, “elastic” is used to regulate work based on movement quality rather than how hard a set feels, as with RPE. The goal is to keep speed, snap, and coordination the same from rep to rep, allowing volume to adjust naturally day to day. Once movements slow down, feel sticky, or lose rebound, the set or session stops, even if more work was planned. This keeps power training focused on true explosive output instead of drifting into grinding or fatigue-based work.
This is often used for plyometrics like jumping, but also for weight room exercises like the push press.
RPE asks “how hard was that?”
Elastic asks “are you still expressing power in this set?”
Frequently Asked Questions
How do I do interval sets, like repeaters / isometric clusters?
Lots of exercises are written as something like “3x 5:5” or “3x 5 on, 5 off”
3x 5:5 would be one set:
5 seconds on, 5 seconds off
5 seconds on, 5 seconds off
5 seconds on. (The final rest period is nullified by your inter-set rest.)
For warmup positional isometrics (like a lockoff or pushup) do not perform the isotonic part of the exercise. For instance with lockoffs you’ll want to stand on a box or bench and pull on to the bar in the lockoff angle. With pushups you can put your knees down and then press up to rest. In some cases like long goblet squat isometrics for the knees, the isotonic can be necessary to get in position.
If you don’t want to count, get an interval timer on your phone, like this one for iPhone or this one for Android. Set it up for the number of sets, and the work:rest ratio (like 5:5) and it’ll count you through the workout. You can also save workout templates on these apps.
For isometric stretches you’ll often do a cluster like the above and then hold the last rep. For these you can still use the timer, and then let the timer expire and hold the last rep by counting manually. With the isometric stretches you should already be warmed up and you can include the isotonic movement.
What should I record in my training log?
For a climbing-based session like Redpoint Strength, or an open session, record the problems/routes you did and how the session felt as a whole. Recording RPE for training sessions is very useful, for you and for me.
10 problems V4-V5, felt tired at the end but good session. RPE6
or, for a sport session:
10c warmup, onsight
11a warmup, onsight
11c, fell third bolt
11c, redpoint second try
11b, flash
For a conditioning session with loads, report loads & how they felt. You can use RIR to indicate how many reps you had in reserve.
1 set 135×5
1 set 155×5
3 sets 165×5. Felt good until the last set, maybe 2 RIR
For a conditioning session without load, just report how it felt.
You can also use the Strong app or Hevy app to record your conditioning sessions. This is what I do and it’s very convenient. At the end of the session, you can use the share button to copy the workout and paste it in your sheet.
For a finger training session, report loads (if there are any) and how the session felt generally.
My training volume is too high. What should I do?
As a general rule of thumb, don’t try to push through your training. If it feels like you’re overtraining, you probably are. Back off, contact me, rest a little bit more and end your sessions a bit earlier. I will help you figure out what’s going wrong, or adjust your plan.
My training isn’t hard enough. What should I do?
Contact me. I will help you figure out what loads/volumes are too low for you, and what we should add to help reach your goals. Don’t add more climbing without talking to me.
How do I figure out what sessions to do when?
Generally, climbing sessions are programmed into A/B/C etc days, so I will do this for you.
Each drill or targeted session has some instructions about how to combine it with other sessions. (Under “combination”.) In brief, here’s the order you should perform activities in:
General warmup
Climbing-specific warmup
Testing
Power or finger strength
Climbing session or drills
Climbing endurance
Strength
Conditioning
Better to mix workouts of the same mode (like a hard drill and a climbing session) than to do multiple workouts of different modes (like training power and endurance) on the same day.
How should I set up my week?
There are two basic strategies: lift and climb on separate days, or on the same day.
If you lift & climb on the same day, you’ll get more rest days before and after each training day, but each day will be individually strenuous. I like to couple my easiest or least-climbing-related lifts with my hardest climbing days, and vice versa. For instance, I would personally avoid doing weighted pull-ups or deadlifts after a hard board session.
For lifting & climbing on separate days:
If you have three climbing days and two training days, this is my favorite structure:
Easier climbing day
Rest
Medium climbing day
Hard lifting day
Rest
Hardest climbing day
Easier lifting day
If you have three climbing and one training day, it’s a lot easier to rest before the hardest sessions.
Some people also like doing a big compound lift before their climbing session, as it feels like they’re fully primed to try hard. Personally I don’t like doing this, but it’s up to personal preference.
If you’re not sure how to set up your week, just ask and I will help!
When should I do my finger training sessions?
In general, you want to train when you’re recovered. This is hard for the fingers since most climbing sessions will target the fingers somewhat. So the advice varies by what kind of session you’re doing.
Keep in mind: if you can’t fit all your training in and feel recovered, it’s not a question of when you’re doing it. It’s probably just too much training.
For maximum-strength style finger training sessions, like recruitment pulls or OTGs, they can be done before your primary climbing session. Don’t do this kind of finger training after a long climbing session.
Capacity or endurance oriented finger training should also not be done when you’re super tired. It makes the most sense to try to do these separately from climbing, like a few hours after climbing or in the morning before a climbing session. That way you have time to recover and rehydrate the tissues before their next stimulus.
“Easy” finger training like minimums can be done almost any time, but I still recommend a short rest period between your climbing session and this training.
I don’t recommend stacking multiple finger training sessions on the same day. “Don’t half-ass two things. Whole ass one thing.” -Ron Swanson
What if I feel like crap on a training day?
If you feel really bad, just don’t train. It’s fine. We want your training to be high quality.
If you just feel kinda bad, I suggest going to the gym/crag, warming up as usual, and giving it a go. If you warm up and still feel bad, you can:
- Do an easier session than you planned
- Do your planned session, but at lower loads/sets/reps (using autoregulation)
- Call it and go home – totally OK.
If you warm up and you feel better, go for it. I have sent projects on days where I felt terrible when I woke up.
However, be honest with yourself. “Pushing through” should be the exception, not the rule. If you push through once you might find victory. If you push through all the time you will almost definitely wind up with overuse problems and regret it.
Is it okay to climb for fun outside the plan?
You should discuss this with me so I can put sessions in that represent this extra time. A little bit of climbing after your warmup to get primed is OK. But if you find you are climbing a lot more or a lot less than your plan indicates, let me know!
I don’t know how to do <X> exercise. How do I learn?
DM/email me first. I can send you form videos, and if you send me a video of yourself I can give you a form check. If you want to research for yourself, here are some good resources:
- For general and barbell training movements, refer to exrx.net, Starting Strength, Jeff Nippard
- For kettlebell movements, refer to Strong First, Mark Wildman, Hardstyle Kettlebell Pro
What if I don’t have problems that are <X> moves long?
Either add moves to the beginning if they’re too short, or drop off the problem halfway up if they’re too long. This is training. Getting to the top is not what matters in training. You have climbing time for sending.
What if my problems are too hard?
The biggest and easiest thing to do is to use any feet on existing problems. This solves many issues. If your drills are still too hard, get in touch with me and we can discuss options.
What if I have other questions?
Email me! coachjfire@gmail.com
DM me! @coachjfire on Instagram
Please don’t hesitate to reach out with questions. When you pay for coaching, access to me and my expertise is what you’re paying for!